Guides
4 Oct 2026

How to Make a PEX Crimp or Clamp Connection (2026) — Step-by-Step Guide
Make a PEX crimp or clamp connection step by step: ring and clamp placement, gauge checks, failed joints and code notes from maker sheets.
How to test water pressure at home in 5 steps — attach a gauge, shut off fixtures, read static pressure, and know what a normal result looks like.
Please note: Information in this guide is based on our research at time of writing and is subject to change. Always consult a licensed plumber for diagnosis of serious plumbing issues before attempting repairs.
Testing your home’s water pressure is the foundational diagnostic check for any pressure-related plumbing symptom. Low flow at the shower, banging pipes, dripping appliance valves, and shortened fitting lifespans can all trace back to a pressure issue — but guessing from symptoms alone means treating the wrong cause. A screw-on pressure gauge threads onto any standard outdoor hose bib in under a minute, and a five-minute test produces an actual number rather than a guess. This guide walks through the five steps for getting an accurate reading and knowing what to do with the result. A single reading taken under the wrong conditions tells you almost nothing; testing correctly is what makes the number useful.
Before you start, our roundup of the best water pressure gauges covers what to buy if you don’t own one yet — a basic screw-on gauge runs less than $15 at any hardware store and is all you need for this test. Once you have your reading, our guide to water pressure too high or too low walks through the next steps for every scenario, from high-pressure PRV installation to low-pressure utility calls.
At a Glance
| Difficulty | Easy |
| Time | 5–10 Minutes |
| Cost | Free if you already own a gauge — $ for a basic gauge |
| Tools Needed | Screw-on water pressure gauge |
| Skill Level | Beginner |
✏️ Our Take
Testing your water pressure is one of the fastest, cheapest diagnostic checks in all of home plumbing — a $10 gauge and five minutes tells you more than guessing from symptoms ever will. Most homeowners only think to test when something’s already gone wrong, like a banging pipe or a weak shower, but testing once a year as routine maintenance catches a slow drift toward dangerously high pressure before it damages anything.
IN THIS GUIDE
A pressure reading turns vague symptoms into a concrete starting point. If your shower pressure has dropped, you might suspect the shower head, a partially closed angle stop valve, mineral buildup on the aerator, or an issue at the water utility — but without a gauge reading from your main supply connection, you can’t separate a whole-house pressure problem from a single-fixture issue. Testing at the main supply first either confirms system-wide pressure is normal, which means the problem is downstream, or reveals that supply pressure is the root cause — which points you directly to the right fix without any further guesswork. Our guide to water pressure too high or too low covers the diagnostic steps for both outcomes.
The second reason testing matters is preventive, and it’s the one most homeowners overlook. High pressure develops gradually — municipal supply pressure can drift upward seasonally, and a pressure reducing valve can fail slowly rather than all at once. Supply pressure that was fine three years ago may now be sitting at 90 psi or above without producing obvious symptoms, until a washing machine hose fails or a fitting connection at the water heater begins to weep. Testing once a year and recording the result gives you a baseline to compare against, so you can catch an upward trend before it causes damage. A reading that’s climbed steadily from 65 to 78 psi over three tests tells you something useful even though 78 psi is still technically under the 80 psi code ceiling.
The core tool is a screw-on water pressure gauge — a dial gauge with a 3/4 inch female hose thread that attaches directly to any standard outdoor hose bib. These are widely available at hardware stores and online; our roundup of the best water pressure gauges covers the most reliable options at every price tier. Beyond the gauge itself, you need an outdoor faucet or hose bib with clear access, and a notepad or phone to record the reading and today’s date. No other tools are required — the gauge hand-tightens on by hand, and the whole test takes five to ten minutes from start to finish.
Any gauge rated to at least 200 psi will cover the full range of residential supply pressures you’re likely to encounter — even a dangerously high reading of 120 psi is well within the range of a standard residential gauge. Look for a gauge with a 0–200 psi dial marked in 10 psi increments with minor markings at 5 psi, which gives you enough precision for this test without overcrowding the dial.
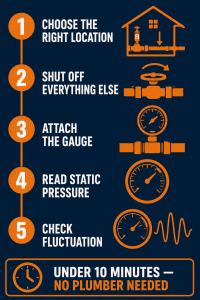
The best test location is the outdoor hose bib closest to where your main water supply line enters the home — typically the bib nearest the water meter, main shut-off valve, or pressure reducing valve if your home has one. This position gives you the most accurate whole-house reading because you’re measuring incoming supply pressure before any branch losses, long pipe runs, or partially closed valves can affect the number downstream. In most US homes this is an exterior faucet on the front or side of the house facing the street, where the main supply enters from underground.
Avoid testing from a hose bib at the far end of a long garden hose run, or a secondary faucet well away from the main entry point. A lengthy pipe run between the supply main and the test point can produce a slightly lower reading than true supply pressure due to friction losses along the way, which may lead you to suspect a pressure deficiency that doesn’t actually exist at the supply level. If your home only has one exterior hose bib, use it regardless of position — just note its approximate distance from the main entry point when recording your result.
Before attaching the gauge, confirm that every fixture and water-using appliance in the home is completely off: all faucets closed, washing machine not mid-cycle, dishwasher off, ice maker idle, and any irrigation or sprinkler system not running. The test you’re taking is static pressure — the pressure of the standing water in your supply line with nothing drawing from it. A test taken while any fixture is running will produce a falsely low reading, because the supply line is simultaneously delivering flow somewhere else and can’t sustain the same pressure it holds at rest.
Take 30 seconds to walk through the home before you go outside and start the test. Check the kitchen, all bathrooms, the laundry room, and — if applicable — the garage and basement for any open fixture or running appliance. The reading you take with everything off is your genuine static supply pressure; anything less than a full shutdown can pull the needle down by 5 to 15 psi and produce a number that misrepresents what your supply is actually doing.
Thread the gauge clockwise directly onto the hose bib outlet. The 3/4 inch female hose thread on the gauge mates with the male hose thread on the bib — the exact same connection a garden hose uses. Turn it by hand until it seats firmly against the bib and sits without wobble. You don’t need Teflon tape or a wrench for this step: the rubber sealing washer inside the gauge coupling provides a sufficient seal for the duration of a test reading, and overtightening with a wrench can damage the bib’s thread or crack the gauge’s inlet port.
Once threaded on, orient the gauge so the dial faces outward in a position you can read clearly from where you’ll be standing when you open the valve. If the gauge body has rotated so the dial faces the wall or an awkward angle, remove it and rethread starting at a different rotational position until the dial faces outward. This is a minor detail that becomes frustrating if you’re trying to read a needle bouncing inside a dial pointed at a fence.
With all fixtures off and the gauge attached, turn the hose bib handle fully open. The gauge needle will jump immediately as pressurised water fills the gauge chamber, then settle to a stable position — this settled reading is your static pressure. Give it five to ten seconds to fully stabilise if the needle continues to drift slightly before reading it. Most residential gauges are marked in 10 psi increments with minor markings at 5 psi, which is sufficient precision for a whole-house pressure check. Read to the nearest 5 psi and note the number.
Write down the reading and today’s date immediately — this is your annual baseline, and it only has value if it’s recorded. A reading without a date attached is useful now and useless next year when you can’t remember whether the number was taken before or after you noticed the pressure increase. Our roundup of the best water pressure gauges includes options with a maximum-pressure indicator needle that holds the highest reading even after you close the valve, which is useful if you want to test and then refer back to the number without keeping the bib open.
With the gauge still attached and the hose bib open, have someone inside the home open a faucet, flush a toilet, or turn on the washing machine. Watch the gauge needle as they do: a small, quick drop of a few psi followed by rapid recovery is completely normal — that’s the supply pressure adjusting briefly to the demand drawn off another fixture. This kind of minor fluctuation is not a sign of any problem and happens in every home.
What you’re watching for is a large pressure drop — 15 psi or more — that takes a long time to recover, or a reading that drops substantially and stays low while the other fixture is running. A large, slow-recovering drop can indicate a supply-side restriction at the street level, a failing pressure reducing valve that can’t maintain consistent output under demand, or a partially closed main shut-off valve that’s throttling flow to the whole house. Record both the settled static reading and the lowest reading you observe during the fluctuation test — both numbers are useful if you later need to describe the situation to a plumber.
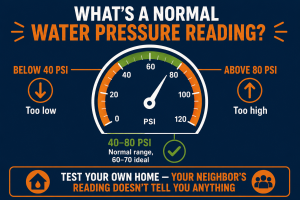
Plumbing codes cap static water pressure at 80 psi and require a regulator above that, and EPA WaterSense specifications cap pressure at 60 psi. The vast majority of US homes with functioning supply infrastructure will test at or below that 80 psi code ceiling. Many homes run comfortably in the 50 to 60 psi range — high enough to deliver comfortable flow at every fixture simultaneously without wasting pressure on friction losses, but not so high that it stresses fittings, appliances, and water heater connections over time. A steady reading at or below 80 psi, with no large fluctuation during the demand test, is generally a healthy result. See our detailed breakdown of what different pressure levels mean for your home at water pressure too high or too low.
Municipal water pressure varies block by block, not just city by city — homes at the bottom of a hill often see higher pressure than homes at the top of the same street, simply due to gravity feeding the system. This means your neighbor’s normal reading tells you very little about your own home; always test your specific connection rather than assuming the whole street matches. Homes in hilly US cities like Pittsburgh, San Francisco, or parts of Seattle can see pressure swings of 20 psi or more between adjacent properties on different elevation contours.
If your reading falls in the upper end of the acceptable range — between 70 and 80 psi, just under the code ceiling — keep a closer eye on it in subsequent years. Supply pressure can drift upward gradually, and a home that tested at 75 psi this year may be at 85 psi in two years if the pressure reducing valve is beginning to fail. Catching that crossing of the 80 psi threshold before it becomes 95 psi is the difference between a PRV adjustment and an emergency repair.
If your gauge reads above 80 psi, the first step is to check whether your home has a pressure reducing valve (PRV) installed. A PRV — also called a pressure regulator — is a bell-shaped fitting typically located on the main supply line just past the water meter inside the home or at the point where the supply enters from underground. If a PRV is present and your pressure is still above 80 psi, the valve may simply need its setting adjusted — our guide to adjusting a pressure regulator valve covers that process — or, if adjustment doesn’t hold, the valve may be failing and need replacement by a licensed plumber. Our comparison of a pressure reducing valve vs water hammer arrestor explains the difference between the two devices and when each is the right solution. If no PRV is installed, having one fitted is the standard fix for high residential supply pressure.
If your gauge reads below 40 psi, work through the most common causes before contacting your water utility. First, check that the main shut-off valve is fully open — a partially closed main shut-off is a surprisingly frequent cause of whole-house low pressure, particularly after any recent plumbing work where it was closed and not fully reopened. Second, check individual fixture aerators and shower heads for mineral buildup that may be restricting flow at a specific outlet without affecting supply pressure. If the gauge at the hose bib reads below 40 psi with the main shut-off fully open and no recent plumbing work, low street-level supply pressure is likely and your water utility is the right contact — supply pressure at the main is their responsibility to investigate and correct.
Testing your water pressure is a straightforward DIY task — but what comes next depends on your reading. If your pressure is above 80 psi and your home lacks a pressure reducing valve, installation of a PRV involves working on the main supply line and is a job best left to a licensed plumber to ensure it’s correctly sized and set for your incoming pressure. Similarly, if your low-pressure test traces back to the street-level supply rather than something inside your home, your water utility handles that side of the system — but a plumber can confirm the diagnosis and advocate on your behalf if needed.
Find a licensed plumber in your area at PlumberArchive.com — the US plumber directory with 12,000+ verified local plumbers across all 50 states.
Get weekly plumbing tips, honest tool reviews and DIY maintenance guides delivered straight to your Facebook feed. We cover water pressure, pipe maintenance, appliance connections and everything in between — written for US homeowners who want to handle more themselves.
Once a year as routine maintenance is the recommended cadence for most US homeowners — enough to catch a slow drift in supply pressure before it crosses into problem territory. Outside the annual cycle, test immediately if you’ve recently had plumbing work done, if you’ve started noticing symptoms like banging pipes, reduced flow, or appliance connections beginning to weep, or if you know your municipality has adjusted supply pressure in your area. Recording the date each time you test means you can spot trends: pressure that was 65 psi two years ago and is now 78 psi tells you something meaningful even though both readings are technically under the 80 psi code ceiling.
Not accurately — the only reliable method is a gauge. Some homeowners try to judge pressure from observation: how fast the bathtub fills, the strength of the shower stream, the flow from the kitchen faucet on full blast. But these observations are influenced by a long list of variables beyond supply pressure — aerator condition, pipe diameter, fixture type, simultaneous demand elsewhere in the home, and mineral buildup in the shower head. A basic screw-on pressure gauge costs less than $15 at any hardware store and threads onto a standard hose bib in seconds. There is no practical substitute that gives you an actual psi reading, and without a number you can’t compare your pressure against the 80 psi code ceiling and the 50–60 psi range that many homes run comfortably in, track changes over time, or communicate a specific problem to a plumber or utility.
Because pressure isn’t uniform throughout your plumbing system, and it isn’t meant to be. The reading at your outdoor hose bib reflects incoming supply pressure before any losses from pipe runs, elevation changes, aerators, or partially closed valves. Inside the home, pressure drops slightly with distance from the main supply as water travels through longer pipe runs, bends, and narrower branch lines. Fixtures on upper floors also see lower pressure than ground-floor fixtures due to the elevation difference — roughly 0.43 psi per foot of height, so a fixture on a second floor 10 feet above the main supply sees about 4 psi less than the basement faucet. A clogged aerator or a partially closed angle stop valve under a single sink can restrict flow at that fixture alone without affecting pressure anywhere else. Testing at the outdoor hose bib nearest the main supply gives you the cleanest baseline — indoor fixture comparisons are more useful for diagnosing individual fixture problems once you’ve confirmed the whole-house supply pressure is normal.
Above 80 psi is considered high and worth addressing. Above 100 psi is genuinely hazardous and should be treated as urgent. At 100 psi and above, the sustained stress on pipe fittings, flexible washing machine hoses, toilet supply lines, and water heater connections is significant — these components are designed for typical residential pressures at or below the 80 psi code ceiling, and sustained exposure above 100 psi accelerates wear at every threaded and compression joint in the home. The most common high-pressure failure point is the flexible braided supply lines under sinks and behind washing machines — these can rupture and flood a room or cabinet in hours if the failure happens when no one is home. If your reading exceeds 100 psi, installing a pressure reducing valve is the appropriate response. Don’t wait.
Testing your home’s water pressure takes under ten minutes and costs nothing if you already own a gauge — less than $15 if you need to buy one. The return on that investment is a concrete number rather than guesswork about whether your symptoms trace back to pressure or to something downstream. Our roundup of the best water pressure gauges covers what to buy if you’re starting from scratch.
Test once, record the reading with today’s date, and treat that number as your annual baseline. Retest each year — or whenever symptoms suggest something has changed — and compare the result to your previous readings. A pressure that was 65 psi last year and is still 65 psi this year tells you the system is stable. A pressure that was 65 psi two years ago and is now 78 psi tells you something worth watching. Establishing the habit of testing and recording is more valuable than any single reading.
If your reading is above the 80 psi code ceiling or well below the 50–60 psi range that many homes run comfortably in, our guide to water pressure too high or too low walks through the diagnostic steps and fixes for both high and low pressure scenarios. And if high pressure is confirmed, our comparison of a pressure reducing valve vs water hammer arrestor clarifies which device addresses which problem — because the two are often confused and are not interchangeable solutions.
✍️ About This Guide
Written by Mike Reynolds, DIY Home Improvement Writer at PlumbingToolsReview — former residential contractor helping US homeowners tackle plumbing repairs with confidence. Learn how we test →
Make a PEX crimp or clamp connection step by step: ring and clamp placement, gauge checks, failed joints and code notes from maker sheets.
Install a bathroom sink pop-up drain assembly step by step: remove the old stopper, seat the flange, connect the pivot rod, and adjust the lift rod strap.
Replace or install a submersible sump pump in an existing pit: disconnect power, set the pump, connect the discharge pipe and check valve, then test.

